
#75 | Enter Nibiru With Stargate
· 3 min read
Stargate is the global liquidity layer for DeFi, powering onchain money movement for native assets and OFTs between 50+ blockchains with instant, guaranteed finality.
With Nibiru’s integration of Stargate, users can seamlessly move assets like ETH, USDC, and USDT from Ethereum to Nibiru in a single transaction.
In this guide, we’ll walk you through how to transfer assets from Ethereum to Nibiru using Stargate.
Note: While this example uses Ethereum, you can also bridge from other networks like Arbitrum, Avalanche, and more.
Before You Begin
Make sure you have the following in place:
EVM-Compatible Wallet
Install an EVM wallet like MetaMask, Coinbase Wallet, or any other wallet that supports Ethereum-based networks. Ensure it’s connected to the Ethereum Mainnet and that you’ve added the Nibiru Mainnet to your wallet.
Nibiru RPCs and Network Info
- EVM RPC:
https://evm-rpc.nibiru.fi - EIP-155 Chain ID: 6900
- EIP-155 Chain ID (HEX): 0x1AF4
- Network Name: cataclysm-1
- Block Explorer URL
Token Contract Addresses
You can add these tokens on Nibiru Mainnet to any EVM wallet.
- Nibiru (WNIBI): 0x0CaCF669f8446BeCA826913a3c6B96aCD4b02a97
- Wrapped Ethereum (WETH): 0xcdA5b77E2E2268D9E09c874c1b9A4c3F07b37555
- Circle (USDC.e): 0x0829F361A05D993d5CEb035cA6DF3446b060970b
- Tether (USDT): 0x43F2376D5D03553aE72F4A8093bbe9de4336EB08
Step-by-Step: Bridge from Ethereum to Nibiru Using Stargate
The bridging process involves connecting your wallet to Stargate, specifying the source/destination chains and asset, and confirming the transaction. Below are the steps to follow:
-
Navigate to Stargate’s official bridge page:
- Click on “Connect Wallet” and connect your EVM wallet.
- When prompted in your wallet, allow the connection. Make sure your wallet is set to Ethereum Mainnet as the active network (since Ethereum is the source chain for this transfer).
-
Select Ethereum as the Source Chain and Nibiru as the Destination. If Nibiru is newly supported, you will need to confirm a prompt to allow Stargate to use the Nibiru network.
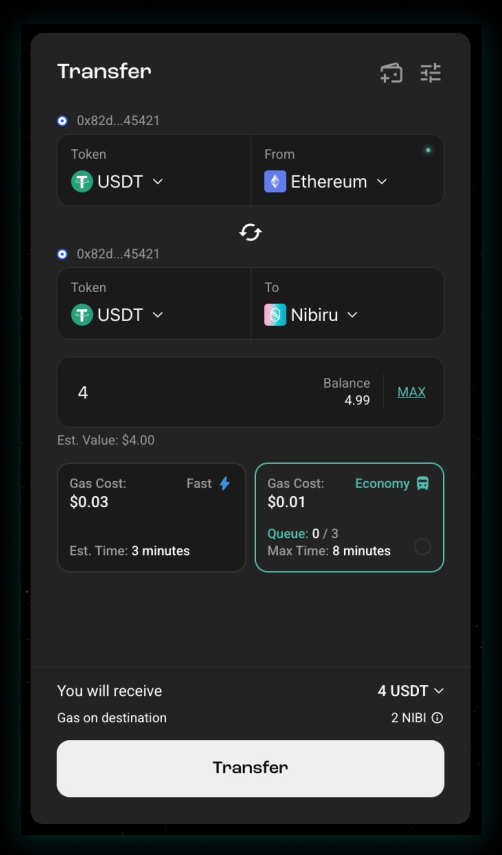
3. Choose the Asset to Bridge: Click the token dropdown menu on the interface to select which asset you want to bridge. Nibiru’s integration supports bridging several major assets. For example, you can choose USDC, USDT, or, ETH. Make sure you pick the correct token that you hold on Ethereum. If you are bridging ETH, select ETH. For stablecoins, choose USDC or USDT as needed. Also ensure the interface shows the correct source network (Ethereum) and destination (Nibiru) for that token. Stargate will automatically recognize the equivalent token on Nibiru. For instance, if you pick USDC, it will bridge to USDC on Nibiru.
4. Enter the Amount to Transfer: In the amount field, type in how much of the asset you want to bridge. The interface will typically show you an estimate of the destination amount after fees. It will also display the bridging fee (which is a small percentage, e.g. ~0.06%) and a slippage tolerance option. Slippage refers to the acceptable change in token price during the transfer; Stargate’s default slippage is 0.5%. You can review and adjust the slippage if you want, but for simple transfers you can leave it at default.
5. Initiate the Bridge Transfer: Once you’ve entered the amount, click the “Transfer” (or “Bridge”) button to begin the bridging process. The app will prompt you to approve the token if this is your first time using Stargate for that asset. This is a one-time Ethereum transaction to give the bridge permission to use your tokens. Approve the token spend in your wallet (and pay a small gas fee for the approval). After approval (or immediately if no approval needed), confirm the bridge transaction in your wallet when it pops up. Your wallet will show the gas fee for the bridge transaction. Once submitted, you’ll see on the Stargate interface that the transfer is processing.
6. Wait for the Transfer to Complete: In the Stargate interface, you should see a progress bar. Typically, Stargate transfers have instant finality once on-chain, but you still need to wait for Ethereum block confirmations. The transfer time may range from under a minute to several minutes depending on Ethereum’s traffic and block times. Once Ethereum confirms and LayerZero relays the message, your funds will appear on Nibiru almost immediately thereafter. Stargate will display a message when the bridging is complete.
7. Switch to Nibiru Network & Verify Receipt: After you get confirmation that the transfer is successful, it’s time to check your funds on Nibiru. Open your wallet and switch your network to Nibiru.
- If you do not see the token in your wallet asset list, you need to import the token contract address for that asset on Nibiru. Copy the official contract address (for example, Nibiru’s USDC contract) and add it as a custom token in your wallet. After adding, your balance will display. Finally, you can also verify receipt via the Nibiru block explorer (e.g., search your address on nibi scan and see the token balance/transaction).
Now that your assets are on Nibiru, you can explore the Nibiru ecosystem with those funds here.
Congratulations, your assets have successfully bridged from Ethereum to Nibiru!
About Stargate
A fully composable native asset bridge with unified liquidity and instant guaranteed finality built on top of LayerZero. Website | Discord | X (Twitter) | Telegram | Medium
Get Involved
The Nibiru Foundation launched Nibiru Ventures, a strategic venture arm dedicated to supporting blockchain projects building natively in the Nibiru ecosystem.